Saturday, June 29, 2013

Another lovely tea cake: blueberry and apple crumble cake

I just love baking tea cakes. Maybe perhaps, I'm bringing out my inner girly-side, but there's just something so pretty and elegant about tea cakes. The apple tea cake was sure a favourite! Tea cakes are incredibly easy to whip up, and can impress your guests.
Cakes and muffins, topped off with streusel/crumb topping are the best part in my opinion. I have been thoroughly enjoying my holidays, and on the day I made this cake, I was sitting on the couch, watching a movie. In my hand, I had a plate with a thick slice of the apple and blueberry crumble cake, with moist crumbs falling off with each bite, and munching on the crumble... Mmm! My ideal day always revolves around eating cakes and brownies.
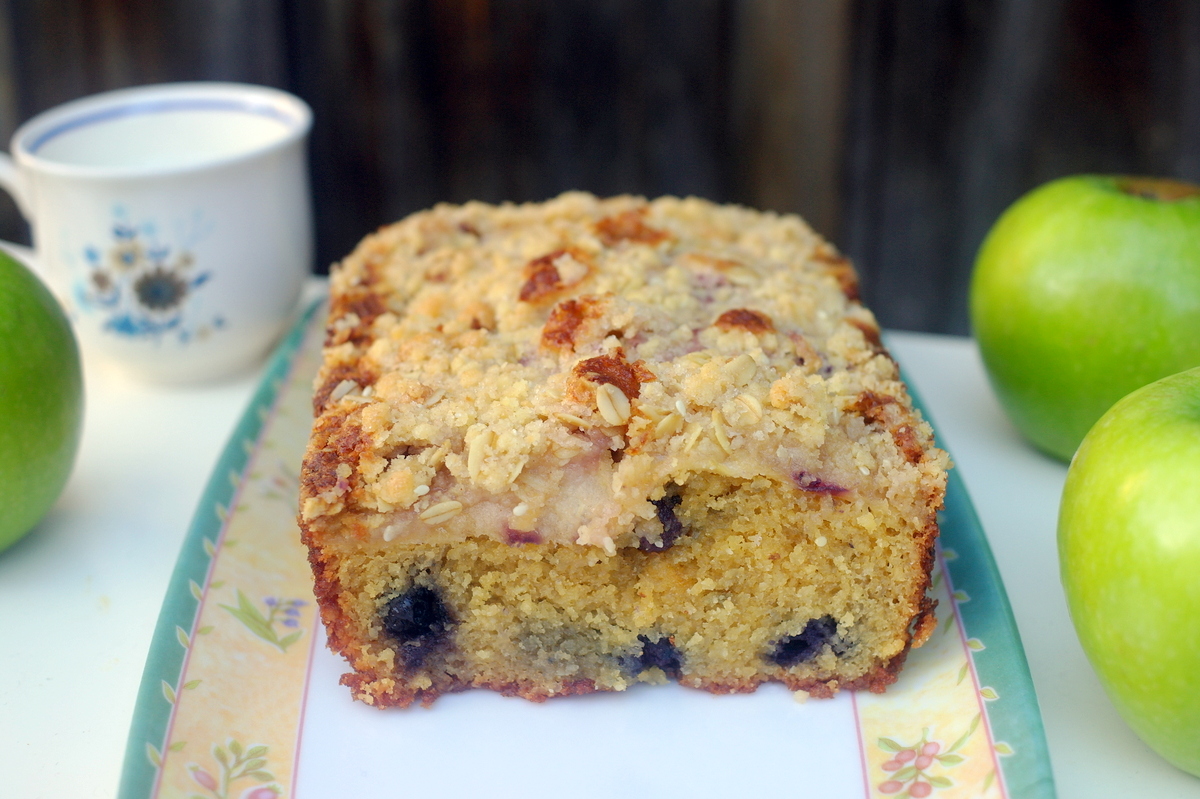
The topping is one of the best crumbles I've had. The quantity it made was quite a bit, and I used all of it up, so there was a thick coating of crumble.. Even my second sister loved the cake because of the crunchy top (and the moist butter cake with blueberries and apples itself). The cake barely lasted 2 days in the house! Okay.. Partially to me eating a lot of it when it first came out of the oven, but I didn't continue to eat the cake the next day!! WHATEVER, all my family members always accuse me of eating the most of something like ice cream or chocolate. It's what you get for being the youngest.. The youngest is always the easiest to bully and blame on. If you're the youngest of the family, you'll know what I'm talking about.

What's your favourite kind of fruit cake/ tea cake?


Apple and blueberry crumble cake
Serves 6-8
Crumble:
50 g unsalted butter, cold and diced
50 g all purpose flour
60 g sugar
2 tbsp rolled oats
1/2 tsp ground cinnamon

Cake:
1 large green apple, peeled and cored
Juice of 1/2 lemon
150 g unsalted butter, softened
75 g sugar
75 g brown sugar
3 large eggs
1 tsp vanilla extract
85 g all purpose flour
1 and 1/2 tsp baking powder
Pinch of salt
100 g almond meal
120 g blueberries (fresh or frozen, unthawed)

Method:
1. Preheat the oven to 180 C/350 F. Lightly butter a 22.5 x 12.5 cm (9 x 5 inch) loaf pan, and line it with baking paper, leaving an overhang on the two opposite sides and butter the paper as well.
2. Make the crumble by rubbing the butter and flour together with the mixture, until it resembles coarse bread crumbs. I actually used a food processor, which does the job much quicker. Stir in the sugar, oats and cinnamon and refrigerate if needed.
3. For the cake, thinly slice the apple and place into a bowl. Drizzle with lemon juice to stop the apple slices from turning brown.
4. In a large bowl of an electric mixer, cream together butter and sugars until light and fluffy.Add the eggs, and beat one at a time. Beat in vanilla, then sift the flour, baking powder and salt over the mixture and fold in. Fold in the almond meal.
5. Pour into the prepared pan and smooth the surface. I put some of the batter in first, then pressed in some blueberries, then layered it with the rest of the batter. Not necessary, But I liked it better that way. Arrange the apple slices and blueberries on top of the batter, and push some of the fruit down onto the batter.
6. Sprinkle with the crumble, and bake for about 1 hour or until golden and a skewer inserted in the centre of the cake, comes out slightly moist.
7. Cool completely in the pan over a wire rack.
Adapted from Technicolor kitchen

Tuesday, June 25, 2013

Chocolate banana pancakes and the Huffington Post

So, some pretty cool news! I'm now a blogger contributor to the Huffington post, one of my favourite news sites to read, especially the opinion articles.

For starters, I made chocolate banana pancakes. They are so, so addictive! Well after all, chocolate makes everything better right?

Head over to the Huffington Post to see the recipe!

Monday, June 24, 2013

Lazy, dead easy lunch: Quinoa fried rice

I'm on a three week break, and today is the first official day. I was feeling lazy for lunch, and thought of what I could find in the pantry. I'm sure everyone has those days; you just fish out whatever you can find in the fridge: leftovers, frozen fish, frozen veggies because you're just too lazy to whip up something that requires too much dish-washing and chopping. So, I decided to make a simple, yet nutritious lunch!
There's still the quinoa craze around, and I only discovered it last year. As a supergrain, it is full of amino acids that we need (we are what we eat!), it contains more fibre than most other grains which means = feeling fuller for longer = win win for over-eaters like me. And it's really easy and quick to cook. For every 1 cup of quinoa, cook it with 2 cups of water. Cook until it has absorbed all the water, roughly 15-20 minutes?

So, a simple quinoa meal that you can take to work, or eat lazily at home is quinoa fried rice.

A lot of people argue that it's really hard to eat healthily, as it is expected to only eat 'carrots and celery sticks'. I say, NO, eating healthily can be as creative and delicious as you want. Remember the oat banana bread that has absolutely no refined sugar, butter or oil I made? Although, it may seem sort of ironic that I'm raving about healthy food, because this is a blog that mainly focuses on desserts, (sometimes outrageously fattening like the Baked brownie. p.s I use too many parentheses), I believe that you can have a treat every now and then. One slice of cake does not make you fat. However, if you eat one whole chocolate cake like the boy in Mathilda in that infamous scene, or a huge slice everyday, you're harming your body and consequently put on more weight.

So just dig up any left overs like meat, vegetables etc and using frozen vegetables are really convenient too! 

Quinoa fried rice
Ingredients
1 cup quinoa
2 cups water 
2 eggs 
Small strips of bacon or ham
1 onion, diced into cubes 
1 red capsicum, sliced into small pieces
Bunch of mushrooms, sliced
Small handful of green beans, chopped 
Frozen vegetables (peas, corn etc. Doesn't have to be thawed, but it would be easier to cook faster)
1 tbsp soy sauce
1 tbsp fish sauce

Method
1. Thoroughly wash the quinoa before using, to get rid of the as the saponin covers the seeds, and needs to be rinsed to get rid of it. Otherwise, you will have bitter quinoa. Once thoroughly rinsed, put it in a pot and combine with 2 cups of water. Cook until all of the water has absorbed, about 10-20 minutes, depending on how high your heat is. 
2. Heat a large pan with about 2 tablespoons of oil (I used sunflower). Fry the 2 eggs, but don't over cook it. Once done, put the eggs aside on another plate and slice them into strips.
2. Add another tablespoon of oil, and cook the onions until slightly brown. Add the bacon or ham. 
3. Then add the red capsicum, mushrooms and the frozen vegetables. 
4. Add the quinoa and mix in the soy sauce and fish sauce. Stir to get an even coating of the sauce.
5. Add the eggs, and cook the fried rice for another minute or two. 

Saturday, June 22, 2013

Classic blueberry muffins


Blueberry muffins are the best way to start a morning, especially after a long week of work experience! I worked at a hospital last week, and it was an amazing experience. But it had long hours, and I still can't comprehend how it's possible to
1. Wake up really early with barely any sleep.
2. Work for more than 10 hours.

I have even more admiration for surgeons, nurses etc who make a hospital work the way it does.

I'll be writing about my experience, because it was really interesting for me to see what a hospital environment is like.
Anyway, I've been a huge fan of those big, bakery style muffins. So huge and delicious, I could just gobble one up in no time. Quite frankly, my previous attempts at blueberry muffins were always mediocre. They weren't the blueberry muffins I had come to known, from a bakery. Soft, fluffy, jammed packed with bursting blueberries.  Now, that's my kind of blueberry muffin.
Jaclyn from Cooking Classy (her blog is amazing) created this blueberry muffin recipe, and even has the title "Finally, the blueberry muffin of my dreams" And that is the perfect description.

Soft like pillows, plentiful of bursting blueberries and a really nice crunchy top (my favourite part) and a lovely streusel. I've seen a lot of recipes where they use butter, but this one uses oil. I can tell you that the oil makes it very moist. I'm in love with the texture, and these are quite the breakfast or afternoon tea you can have.
I used frozen blueberries because blueberries aren't in season, and they're never cheap to buy. Just be careful when mixing in your blueberries, especially when it's frozen. You should do it at the very last minute because there will be blue marks everywhere and unless you want your muffin to look like a smurf, I highly suggest don't mix it in too early. Another important part is before adding the blueberries, do not over mix your batter! If you mix it too much, your muffin with be tough and leathery. That just sounds like the texture of crocodile meat. If you want soft, fluffy muffins the key is to NOT overmix!

What's your favourite type of muffin?


Blueberry muffins
Yields 14 muffins
Ingredients
1 and 3/4 cup all-purpose flour
2 tsp baking powder
1/4 tsp baking soda
1/2 tsp salt
1 cup sugar
1/2 cup buttermilk (substitute: just put some vinegar or lemon juice into regular milk and let it stand)
7 tbsp  oil (or 1/2 cup then remove 1 tbsp) - I used sunflower oil
1 large egg
2 tbsp sour cream or Greek yoghurt (I used yoghurt since I didn't have sour cream)
1 and 1/2 cup fresh blueberries (I reduced this to about 1 cup of frozen blueberries)

Crumb topping
1/3 cup all-purpose flour
1 and 1/2 tbsp sugar
2 and 1/2 tbsp chilled butter, diced
1 and 1/2 tbsp raw sugar -DON'T skip this part please! Jaclyn says that it is the 'crowning jewel', couldn't agree any better.
1/2 tsp cinnamon

Method:
1. Prepare crumb topping by mixing 1/3 cup flour, 1/2 tsp of cinnamon, 1 and 1/2 tbsp sugar, 2 and 1/2 tbsp butter in a food processor. Pulse until it is combined, it should be very fluffy. Then pour the mixture into a small bowl and whisk in the 1 and 1/2 tbsp raw sugar.
2. In a mixing bowl, sift flour, baking powder, baking soda and salt and set aside. In a separate mixing bowl, using a whisk (not electric mixer), mix together 1 cup of sugar, buttermilk, oil, egg and sour cream or yoghurt for 1 minute. Gently whisk in dry mixture until combined, batter should be slightly lumpy. DO NOT OVER MIX! Fold in blueberries carefully (be extra careful if using frozen blueberries), and divide mixture evenly among 12-14 paper lined muffin tins. Allow muffins to rest at room temperature for about 10 minutes. Preheat oven to 400 F or 200 C.
3. After the muffins have rested, fluff crumb topping with a fork, and sprinkle each muffin evenly with 1 tbsp crumb topping mixture. Bake muffins for 19-23 minutes or until lightly golden and a toothpick inserted in the centre comes out clean.
4. Allow to cool several minutes in the muffin pan before removing to wire rack to cool.

Adapted from Cooking Classy 

Saturday, June 15, 2013

Japanese cheesecake cupcakes


The weather has been driving me absolutely nuts. Last week, the weather was so miserable, I could not go for a run. And when I'm too lazy to go for runs, that equals to = more laziness and eating. And now, I'm even more annoyed because the sun just started to shine, and I already ate lunch BECAUSE THE SKY WAS GREY. So my mood and my tummy are not too happy. People who live in Melbourne will understand my annoyance at the weather.
Anyway, what's not annoying are these cupcakes. They're kind of dreamy to me. Perhaps, like Dr. McDreamy to Grey's anatomy fans. But these are McCheesecake-dreamy (or should it be the other way around?). Like eating clouds or pillows? Get what I mean?
As a child, I would always love to peer outside the window (always loved the window seat) while flying because I was intrigued about clouds, since they looked like cotton balls to me. I had crazy thoughts, like any other 3 year old. "What if I could jump out of the plane and sleep on one of those clouds?" The original title of the recipe is "Cotton soft cheesecake". It is really like cotton-soft-cloud-cheesecake.

I was able to make 12 cheesecake cupcakes and 1 loaf! The batter is quite a bit, so I recommend halving the recipe if you're making cupcakes. I also put a green tea swirl, and stupidly enough I forgot to add some sugar. So it was a bit too bitter, so later I put some jam on top to try and balance it out. I also think a chocolate swirl would be really nice! Just use cocoa powder instead.

This is a different recipe to the one I used for my big Japanese cheesecake with the strawberries. I like both recipes, both easy! Although, I'll have to admit that I like the cornstarch added to it because I feel that it adds a bit more fluffiness, but nevertheless I still love Nami's recipe (the other one I used).

Japanese cheesecake
Ingredients
250 g (9 oz) cream cheese
140 g (5 oz) granulated sugar *
6 egg whites
6 egg yolks
1/4 tsp cream of tartar
50 g (2 oz) unsalted butter
100 ml (3.3 oz) fresh milk
1 tbsp lemon juice
60 g/2 oz cake flour / superfine flour (I didn't have cake flour, so I just one tbsp flour and added more cornstarch)
20 g/ 1 oz cornflour (cornstarch)
1/4 tsp salt
* I increased the sugar to 155 g because I know that Japanese cheesecake is not very sweet, and I like eating it plain but with just enough sweetness.

*swirl (if using) : mix 1 tbsp of green tea powder with 3-4 tbsp of hot water. Add a bit of sugar if desired (recommended).

Method:
1. Melt cream cheese, butter and milk over a double boiler. Cool the mixture and then sift flour, cornflour, add the egg yolks, lemon juice and mix well.
2. Whisk egg whites with cream of tartar until foamy. Add sugar and whisk until soft peak forms.
3. Add the cheese mixture to egg white mixture and mix well. Pour into an 8 inch round cake pan or into desired pan.
4. Bake cheesecake in a water bath for 1 hour and 10 minutes or until set and golden brown at 160 C (325 F)
Adapted from Diana's desserts

Thursday, June 13, 2013

Raspberry and walnut cocoa brownies

Yet another brownie post, I don't think I'll ever get sick of brownies. Melting butter and chocolate with a hint of espresso is honestly so fragrant, and whipping up brownies on a late night is perfect. Midnight brownies I'd say. Although, the flavour gets better the next day, as does with any cake or brownie. The next day, it has developed its texture and your tastebuds will be screaming "Oh my goodness how did it get this good?"
Truth to be told, I didn't really expect much from these brownies because they use cocoa. But I decided to give it a go anyway, because I was curious. But, I added some raspberries which are perfect. Kind of reminds me of the flourless chocolate cake I made, except this is a brownie and is more dense. Put it in the fridge, it becomes fudge like!

After I ate one, I stood there for a moment and pondered. "This is good. Wait no. This is really good." I like the slightly crunchy top, and the fact that it's not too sweet (I used 3/4 cup instead of 1 and 1/4) and with the crunch of walnuts? It spells a-d-d-i-c-t-i-v-e.  I also like it straight from the fridge! 

Raspberry and walnut cocoa brownies
Yields 16 large or 25 smaller brownies (I used a 8 x 8 pan)
Ingredients:
10 tbsp (140 g) unsalted butter
1 and 1/4 cup (250 g) sugar *although I reduced this to 3/4 cup
3/4 cup plus 2 tbsp (65 g) unsweetened cocoa powder (I used Dutch-process)
1/4 tsp salt
1/2 tsp vanilla extract
2 large eggs, cold
1/2 cup (65 g) all purpose flour
2/3 cup (75 g) walnuts or pecans *optional
2/3 cup raspberries *optional

Method:
1. Preheat the oven to 325 F (although I just used 180 C). Line the bottom and sides of a baking pan with parchment paper.
2. Combine butter, sugar, cocoa and salt in a medium heatproof bowl and set the bowl in a wide skillet of barely simmering water.
3. Stir from time to time until the butter is melted, and the mixture is smooth.
4. Remove the bowl and set aside until the mixture is warm, not hot.
5. Stir in vanilla and then add the eggs, one at a time.
6. Then, add the flour and stir until you cannot see it any longer.
7. Add the nuts and raspberries if you are using.
8. Bake until a toothpick inserted into the centre is slightly moist with batter, about 20 to 25 minutes (however I needed to bake it for 10 minutes longer). Let cool completely on a rack. Smitten Kitchen's tip is to freeze it for a while and then cut it with clean lines. I did so, and it is a really good tip to get really clean cuts!

Adapted from Alice Mendrich via Smitten Kitchen

Sunday, June 9, 2013

Easy lemonade scones


This is the easiest scone recipe you will ever use. Thick and fluffy, perfect for an afternoon tea.
4 ingredients (though lemonade is made up of a few ingredients and there is egg yolk for glazing) and bam. Plus this doesn't use any butter or refined sugar, sooo I'm going to pretend like these are not too bad for you....

Lol jokes aside, my mum has been making these for years, and each time without fail, there's been one warm scone, sandwiched with a dollop of whipped cream and strawberry jam in my mouth.

I love the addition of raisins, and the texture is amazing. These will make people impressed (like my piano teacher), and would certainly be suitable if you're hosting a high tea party :) I haven't done that before believe it or not, but that is on my to-do list hehehe

I also made a video. It's my first time, so excuse my video techniques. Not quite sure what went wrong with the video quality (looks a bit pixelated). I just did this for fun and really enjoyed the process of it.

OH and the best feeling ever is that I'VE FINISHED MID YEAR EXAMS! Don't know why this year I binged a lot on junk, a lot more than usual during exam period. But I am trying to run off the excess weight :P
My mid year exams went quite well, although I don't want to say too much yet. You know how you want to say that it went great, but then you kind of just don't want to jinx it? Yeah. That's how I feel. But anyway, I have Monday off (Queen's birthday), so what a perfect long weekend! I have a Japanese cheesecake post coming up soon, so look out.

What is your favouite thing to eat for afternoon tea?

Lemonade scones
Ingredients:
325 g self-raising flour *
2/3 cup (170 ml) cold lemonade
2/3 cup (170 ml) thickened cream/heavy cream
1/2 cup raisins (optional)
* Egg yolks for the glaze (also optional, but I like to give it some colour )

* It may be possible to use plain flour and add some raising agents (baking powder etc), but I have not tried that before. I'm also not sure with the unit conversions for the U.S standard, so just convert it.

Method
1. Preheat oven to 225 degrees C/400 F (I preheated mine to 200 C)
2. Sift flour into a large bowl. Combine lemonade and cream in a cup.
3. Add the lemonade and cream into the sifted flour mixture, and gently fold ingredients.
4. Add raisins and combine together. Do not over mix, otherwise this will result in tough scones. The dough will be soft and sticky.
5. Place the dough on a lightly floured bench and spread dough and roll it out to about 3.5 cm thick (about 1.3 inch) and use a shaped cutter or a knife to cut the dough.
6. Place scones together close together on the tray so they are touching. Glaze with egg yolks on the top.
7. Bake for about 12-15 minutes (however I found that about 20 minutes was desirable otherwise I would've had under-cooked scones), or until pale golden and cooked through.
8. If you like scones to have a soft crust, cover them with a tea towel for a few minutes.
9. Serve hot or warm up in the microwave later.

Adapted from All recipes

Saturday, June 1, 2013

Brown butter chocolate chip cookies - last post before exams


You've heard it before... 'The best ---- EVER' and so on, and please know that I really do try to avoid using that title in my posts... Because is there really such thing as the ultimate 'best'?